Spider Plant Care and How to Grow the Babies
How do I care for a spider plant and propagate its plantlets?
On this page
Why the Spider Plant Is the Perfect First Houseplant
If you want one plant that's nearly impossible to kill, start with the spider plant (Chlorophytum comosum). It's fast-growing and forgiving, so the occasional missed watering or less-than-perfect window won't sink it—exactly what a new plant parent needs.
It's also apartment-friendly in the ways that matter most:
- Pet-safe. Spider plants are non-toxic to cats and dogs. That includes the curly 'Bonnie' variety, so you don't have to plant-proof your home.
- A proven air purifier. Studies show it helps clean indoor air by absorbing common household chemicals like formaldehyde, xylene, benzene, and carbon monoxide—handy in a closed-up apartment.
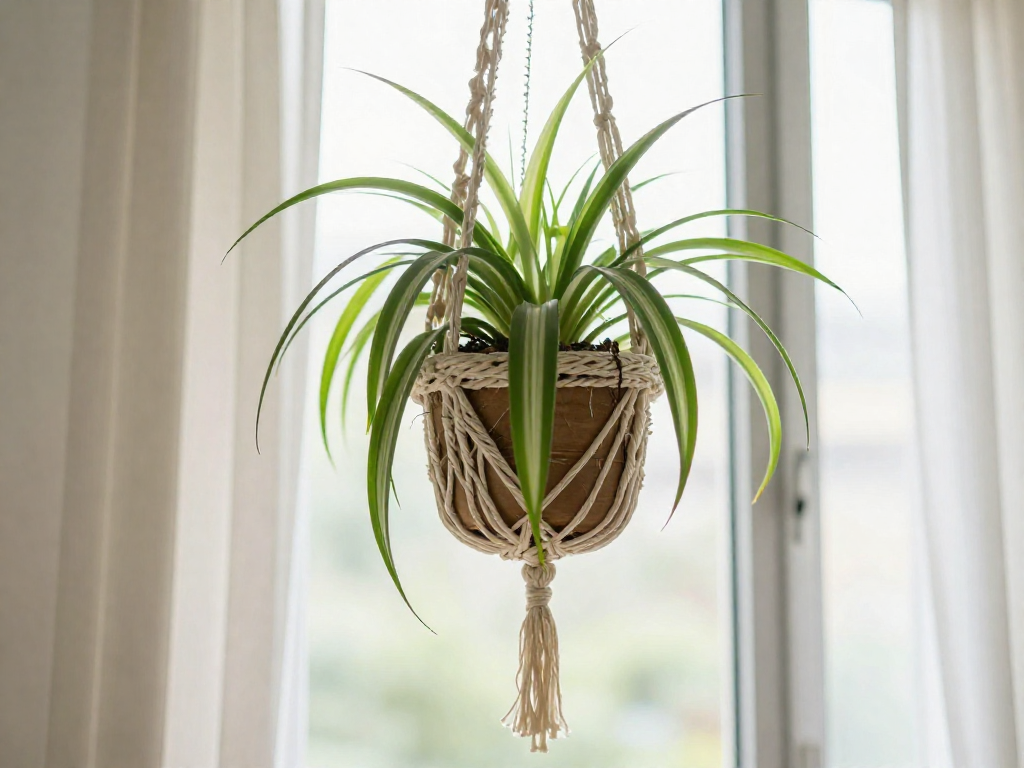
- Sized for small spaces. A mature plant reaches about 2 to 2.5 feet wide, with arching foliage that trails 2 to 3 feet in a hanging basket—perfect for a shelf, a corner, or above a windowsill.
- Free plants. It sends out baby plantlets (called "spiderettes") that you can root into brand-new plants for nothing.
In short: low effort, low risk, and a plant that literally gives back.
Light: Bright, Indirect Is the Sweet Spot
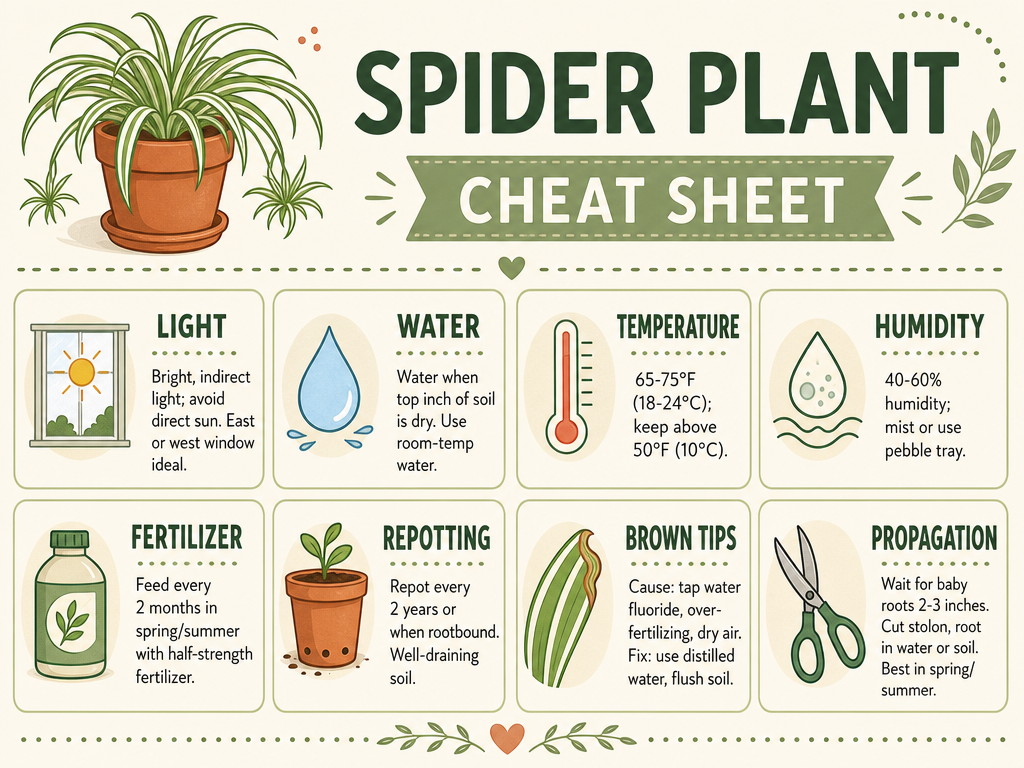
Spider plants do best in bright, indirect light — light that reaches the plant without the sun's rays hitting the leaves directly. An east- or west-facing window is ideal, giving your plant a few hours of gentle morning or afternoon sun while filtering out the harsh midday glare.
Here's the mistake new plant parents make most: setting a spider plant in a south-facing window with direct sun. Direct sun scorches the leaves, leaving crispy brown patches. Go the other way with too little light, and you'll notice the opposite problem — the white stripes (called variegation) fade to plain green, and growth slows to a crawl.
A quick habit that pays off: rotate the pot a quarter turn every week or two. Plants lean toward light, so rotating keeps growth even and stops your plant from looking lopsided.
Spider plants are forgiving and will tolerate a lower-light corner, but there's a trade-off — in dimmer spots they grow more slowly and produce fewer of the baby plantlets (the "spiderettes") that make them so fun to propagate. If you want lots of babies, give them plenty of bright, indirect light.
Watering, Humidity, and Temperature
Once your spider plant has the right light, its day-to-day survival comes down to three things: how you water, the moisture in the air, and the temperature of the room. The good news is that spider plants are forgiving, so you don't need to be exact—just consistent.
Watering: let the top inch dry out
Stick your finger about an inch into the soil. If that top inch feels dry, it's time to water; if it's still damp, wait. Spider plants tolerate the occasional missed watering far better than they tolerate soggy roots, so when in doubt, wait a day. Overwatering (keeping the soil constantly wet) is the fastest way to rot the roots, so always let excess water drain out the bottom of the pot.
Use room-temperature water rather than cold water straight from the fridge, which can shock the roots. If you notice brown leaf tips, tap water minerals may be the cause—let tap water sit uncovered for 24 to 48 hours so the chlorine evaporates, or use filtered or rainwater.
Adjust with the seasons: plants drink more during the active growing months of spring and summer, and noticeably less in winter when growth slows. Check the soil weekly and water only when that top inch is dry, rather than on a fixed schedule.
Humidity and temperature
Spider plants like moderate humidity of 40–60%. Most apartments sit fine within this range, but if your air is dry (common in winter with the heat running), group plants together, set a shallow tray of water nearby, or run a small humidifier.
Aim for a room temperature of 60–75°F (15–24°C). They can survive brief dips to about 50°F (10°C), but keep them away from cold drafts, drafty windows, and blasts from heating vents or air conditioners.
Soil, Feeding, and Repotting
Spider plants aren't fussy, but getting the soil, feeding, and repotting right is what keeps them lush and pumping out babies.
Soil
Use a general-purpose potting mix that drains well. To improve drainage, stir in a handful of perlite (lightweight white volcanic granules) or coarse sand—this keeps the roots from sitting in soggy soil, which causes rot.
Feeding
Less is more with spider plants. Feed only in spring and summer, when the plant is actively growing, using a balanced water-soluble fertilizer diluted to half the recommended strength about every two months. Skip feeding in fall and winter when growth slows.
Resist the urge to overfeed. Heavily fertilized spider plants tend to produce fewer plantlets (the baby offshoots) and develop brown leaf tips. If you just repotted, wait four to six months before feeding so the fresh mix's nutrients aren't overwhelmed by fertilizer.
Repotting
Spider plants grow fast and form thick, fleshy tuberous roots (swollen, water-storing roots). Repot roughly every two years, or sooner if the roots become crowded, poke out of the drainage holes, or start to crack the pot. You can repot at any time of year.
One handy quirk: a slightly pot-bound plant—one whose roots fill the container—actually produces more plantlets. So don't rush to size up. When you do, move to a pot just one size larger.
Fixing Brown Leaf Tips (The #1 Complaint)
Brown, crispy leaf tips are the most common spider plant complaint—and the fix is usually your water. Spider plants are sensitive to the fluoride, chlorine, and mineral salts found in most US tap water. Over time these chemicals build up in the soil and burn the leaf tissue, starting at the tips.
The main culprits:
- Tap water chemicals. Fluoride, chlorine, calcium, and magnesium accumulate as salt buildup that damages leaf tips.
- Over-fertilizing. Too much plant food adds soluble salts. Feed only every two months in spring and summer, diluted to half strength.
- Dry air or dry soil. Spider plants like moderate humidity (roughly 40–60%). Water when the top inch of soil is dry.
How to fix and prevent it:
- Switch your water. Use distilled water or rainwater. If you only have tap, let it sit in an open container for 24–48 hours so the chlorine can evaporate. Use room-temperature water, not cold from the fridge.
- Flush the soil. When the plant isn't waterlogged, slowly pour a large watering can of rainwater or distilled water through the pot to rinse out built-up salts.
- Trim cosmetically. Snip off brown tips with clean scissors, following the leaf's natural point and staying in the dead tissue—don't cut into healthy green.
Once the water source improves, new growth should come in clean.
How to Grow the Babies: 3 Ways to Propagate Plantlets
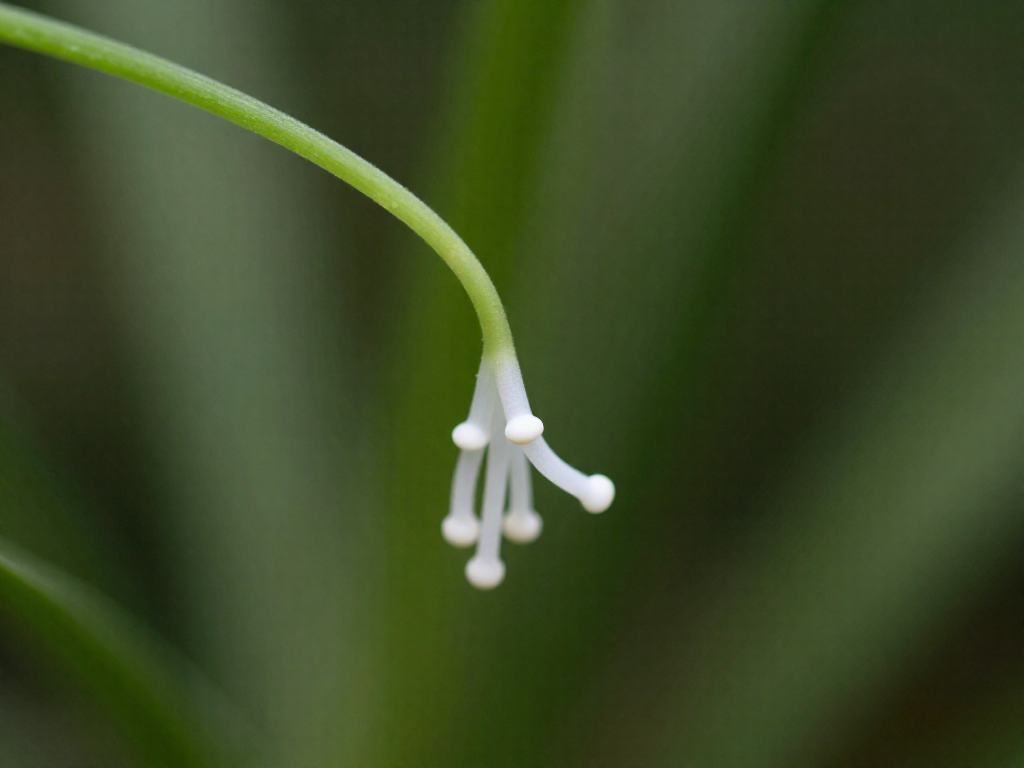
The best part of a spider plant is the free plants it hands you. Those baby plants—called plantlets or spiderettes—dangle from thin, wiry stems known as stolons, usually appearing after the plant sends out tiny white, star-shaped flowers. A healthy plant in good light typically starts producing them after about a year, and the ideal time to propagate is spring or summer, during active growth.
Before you cut, look at the base of each baby. Wait until you see tiny white root bumps starting to form. Then make a clean cut close to the baby, leaving about a quarter-inch of stolon attached.
Method 1 – Root in Water
Snip a spiderette that has small root bumps and trim any lower leaves that would sit underwater. Place it in distilled water in a spot with bright, indirect light, and refresh the water every few days. Once roots reach 2–3 inches, pot it up in a general-purpose potting mix. This method is fast and lets you watch roots develop—just know that water-grown roots are more fragile and can struggle a bit at transplant.
Method 2 – Root in Soil (While Still Attached)
This method has a slightly higher success rate. Set a pot of moist potting mix next to the mother plant, lay a plantlet on the soil surface, and hold it in place with a bent paper clip or piece of wire. Leave it attached to the mother so it keeps feeding while it roots. Once it's anchored with its own roots, sever the connecting stolon. Roots started in soil skip the transplant shock entirely.
Method 3 – Leave Them Attached
Not sure you want more pots? Simply leave the plantlets on the mother plant. They'll cascade over the edge of a hanging basket for a fuller, fountain-like look—no cutting required.
One note: babies are clones of the mother and keep her variegation. Plants grown from seed often lose those white stripes.
Common Problems and Quick Troubleshooting
Most spider plant issues are easy to spot once you know the signs. Use this quick guide to self-diagnose.
Pests. Watch for spider mites (tiny specks and fine webbing), whiteflies, scale (small brown bumps), and aphids. Wipe leaves with a damp cloth, rinse the plant in the shower, and treat early with insecticidal soap before the problem spreads.
No babies (plantlets)? Plantlets are the small offshoots that grow on long stems. A plant may be too young—most need about a year of growth—or it may be underwatered or over-fertilized, both of which reduce plantlet production.
Pale or leggy growth. Long, stretched, faded leaves mean too little light. Move the plant closer to a bright, indirect window.
Yellowing leaves. This usually signals overwatering. Let the top inch of soil dry out before watering again.
Sources
- Spider Plant Care Guide: the classic Chlorophytum comosum houseplant – Happy Houseplants — happyhouseplants.co.uk
- Spider Plant Care - How to Grow Chlorophytum comosum - Soltech — soltech.com
- Spider plant, Chlorophytum comosum – Wisconsin Horticulture — hort.extension.wisc.edu
- Spider Plant (Chlorophytum comosum) | Home & Garden Information Center — hgic.clemson.edu
- What Causes Spider Plant Brown Tips? — spider-farmer.com
- Tap Water Vs. Filtered Water: What's Best For Spider Plants In The UAE – growhub — growhub.ae
- How to Easily Propagate Spider Plants: A Step-by-Step Guide — livelyroot.com
- How to Propagate Spider Plant with/without Babies — spider-farmer.com
- COMPLETE Spider Plant Care - Watering, Lighting, Repotting, Propagation & More -Houseplant Care 101 — youtube.com
FAQ
How often should I water a spider plant?
Water when the top inch of soil feels dry—usually about every 7-10 days, though you'll water more often in warm, bright months and less in winter. Check the soil with your finger rather than sticking to a fixed schedule. Spider plants are forgiving, but overwatering (leaving the soil soggy) is the most common way to harm them, so always let the top inch dry out first. Use room-temperature water rather than cold water straight from the fridge.
Why does my spider plant have brown tips?
Brown leaf tips are usually caused by minerals and chemicals in tap water building up in the soil. Fluoride, chlorine, calcium, and magnesium accumulate as salts that damage leaf tissue, and too much fertilizer has the same effect. Low humidity and letting the soil get bone-dry can also brown the tips. To fix it: switch to distilled water, filtered water, or rainwater; or let tap water sit in an open container for 24-48 hours so chlorine evaporates. You can also flush built-up salts by slowly pouring a large amount of rainwater through the pot (only when the plant isn't waterlogged), and ease off on fertilizer. Trim brown tips off with clean scissors for appearance—it won't hurt the plant.
Are spider plants safe for cats and dogs?
Yes. Spider plants are non-toxic to cats and dogs, including popular varieties like the curly 'Bonnie,' which makes them one of the best choices for pet-friendly apartments. Cats are sometimes drawn to nibble the arching leaves because the plant has a mild stimulating effect on them, but it isn't poisonous. As a bonus, spider plants are also effective at cleaning indoor air, absorbing chemicals like formaldehyde, xylene, and benzene.
How long does it take spider plant babies to root?
It varies, but if you propagate a baby (also called a plantlet or spiderette) in water, wait until the roots are about 2-3 inches long before moving it to soil—this typically takes a couple of weeks. If you root a baby directly in soil, plantlets root readily as soon as they make good contact with moist potting mix. A helpful shortcut: leave the baby attached to the mother plant and set it on top of a nearby pot of soil, holding it down with a bent paperclip; once it roots, snip the connecting stem. Propagate in spring or summer during active growth for the fastest, most reliable results.
Should I propagate spider plant babies in water or soil?
Both work, so it comes down to preference. Water propagation lets you watch the roots develop and is satisfying for beginners, but water-grown roots are more fragile and can struggle a bit when you transplant them into soil. Soil propagation is slightly more successful because the roots adapt to their permanent home from the start. If you use water, cut a healthy baby, trim any lower leaves that would sit underwater, place it in distilled water in bright indirect light, refresh the water occasionally, and wait until roots reach 2-3 inches before potting up. Either way, leave about a quarter-inch of the wiry connecting stem (the stolon) attached when you cut the baby free.
Why isn't my spider plant growing babies?
The most common reasons are the plant being too young, not pot-bound enough, or getting too much fertilizer. Spider plants produce the most babies when they're mature (often around a year old), slightly root-bound in their pot, and growing in bright, indirect light. Heavy feeding actually reduces plantlet production, so cut back to a diluted, balanced fertilizer every few months during spring and summer only. Babies also form in response to shorter days and long, uninterrupted nights, so a spot without artificial light at night can encourage them. Finally, make sure the plant isn't underwatered or stressed, since a struggling plant puts its energy into survival rather than making babies.
Do spider plants need direct sunlight?
No—spider plants prefer bright, indirect light and can scorch in direct sun. "Indirect light" means bright light that doesn't fall straight onto the leaves, such as near an east- or west-facing window with filtered sunlight. They tolerate lower light but may grow slowly and lose some of their variegation (the white striping on the leaves). Rotate the pot occasionally so the plant grows evenly instead of leaning toward the window.
See also
- Beginner's guide to watering houseplants without overwatering
- Best low-light houseplants for apartments
- Pet-safe houseplants for cat and dog owners
- How to fix brown leaf tips on houseplants
- Houseplant propagation for beginners: water vs soil
Related articles
Pothos vs. Philodendron vs. Snake Plant: Which Should You Start With?
Pothos, philodendron, or snake plant—which easy houseplant is the best first choice for your apartment? A clear, plant-by-plant comparison for new plant parents.
Jul 14, 2026 · 7 min read
Jade Plant Care: The Easy Beginner Succulent Tree
Learn how to care for a jade plant indoors: watering, light, soil, plus simple pruning to shape a bushy little succulent tree. Beginner-friendly, step by step.
Jul 14, 2026 · 9 min read
Fiddle Leaf Fig Care: Why It's Fussy and How to Cope
Can a beginner keep a fiddle leaf fig alive? An honest, plant-by-plant care guide covering light, watering, drafts, and how to fix brown spots and leaf drop.
Jul 14, 2026 · 12 min read