How to Propagate Pothos and Other Vines in Water
How do I propagate my plant cuttings in water?
On this page
What You'll Need (and Why It's So Beginner-Friendly)
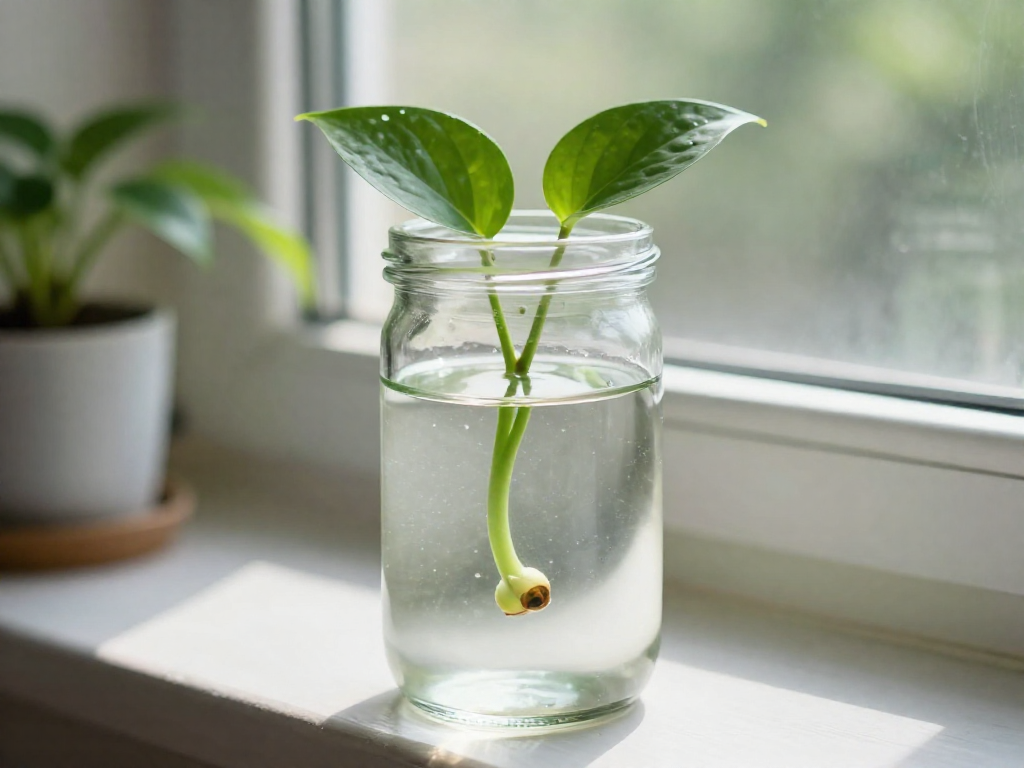
Water propagation is the easiest way to make new plants because a submerged node—the small bump on a stem where leaves and roots grow—will sprout roots in plain water. No soil, no misting setup, no special skills. You just watch it happen.
Here's the good news: you probably own everything already.
Your short supply list:
- Sharp, clean scissors or pruners — a clean cut prevents introducing rot. Wipe the blades with rubbing alcohol before you start.
- A clear glass container with a narrow opening — the narrow mouth holds the cutting upright, and clear glass lets you monitor the water, spot algae early, and watch roots form (the fun part).
- Room-temperature water — roots don't like water that's too cold or too hot, so let tap water sit until it's comfortable to the touch.
Optional extras:
- Rooting hormone — can speed up rooting, but use only a tiny amount; too much actually slows roots down.
- A grow light — helpful if your room is dark, since more bright, indirect light means faster roots.
One rule before you snip: start with a healthy parent plant that's free of pests and disease, so you're not passing problems on to your cutting.
How to Take the Perfect Cutting (Find the Node)
Getting this one step right is the difference between a jar full of roots and a leaf that just sits there for weeks doing nothing. Everything hinges on the node.
First, find the node
A node is the small brown bump where a leaf meets the stem. It looks minor, but it holds the "blank slate" cells that turn into roots once they sense water. A leaf with no node attached will never grow roots, no matter how long you wait. So before you cut anything, run your finger along the vine and spot those little bumps.
Make the cut
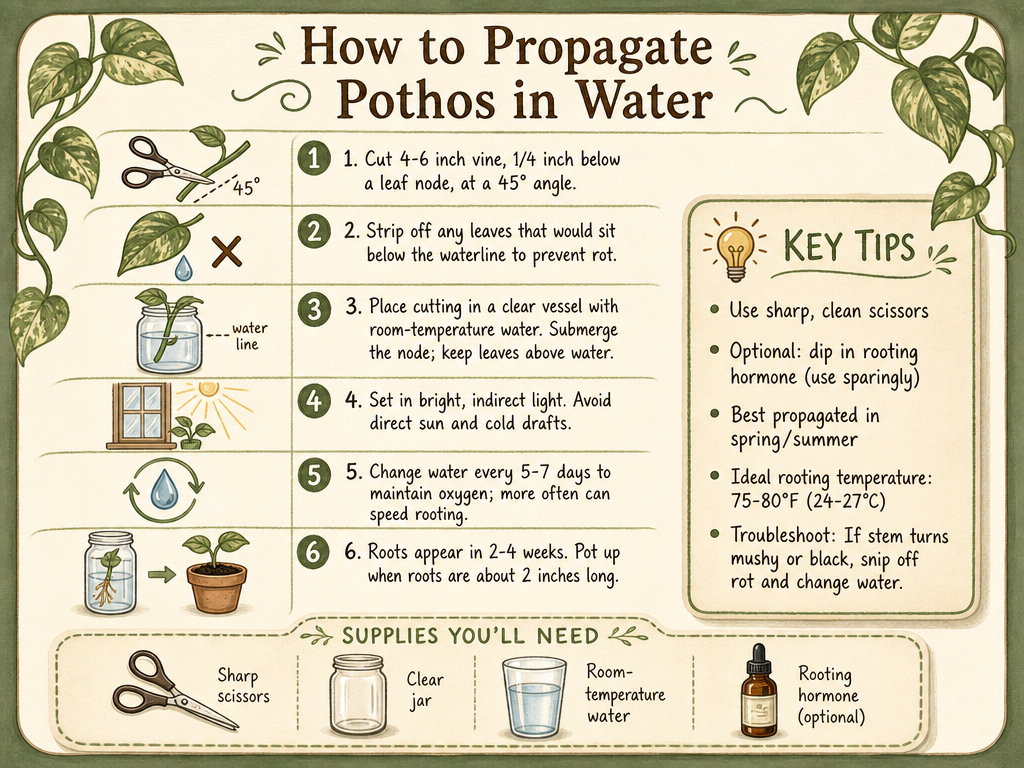
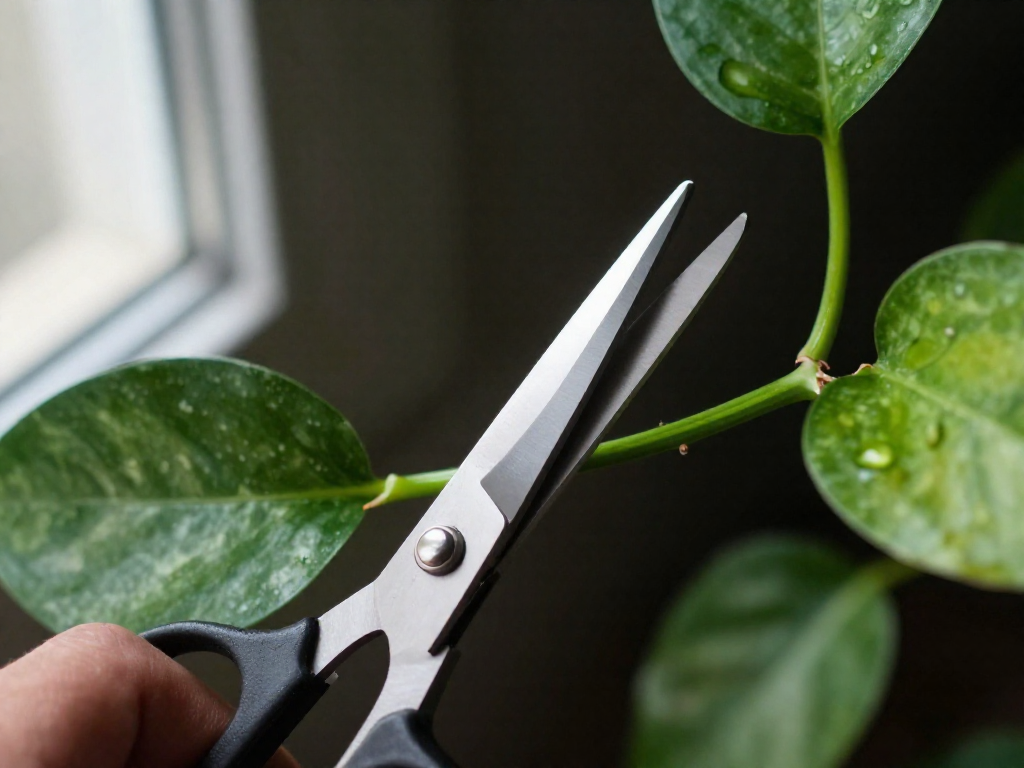
- Cut about 1/4 inch below a node using clean scissors. That short bit of stem below the node is where the roots will emerge.
- Make each cutting 4–6 inches long, with at least one node and several healthy leaves. The node gives you roots; the leaves keep the cutting fed through photosynthesis (how a plant makes energy from light) while it works on rooting.
- Cut at a rough 45-degree angle rather than straight across. The slanted cut exposes a bit more surface area for the stem to take up water. The exact angle doesn't matter—just aim for a diagonal.
Strip the lower leaves
Finally, pull off any leaves near the bottom that would sit below the waterline once the cutting goes in your jar. Submerged leaves rot, turn the water cloudy, and can spoil the whole cutting. Leave the top two to four leaves and you're ready to propagate.
Step-by-Step: Putting Your Cutting in Water
Once you've taken a cutting with a healthy node (the small bump on the stem where leaves and roots grow), the rest is quick. Follow these steps:
-
Fill a clear, narrow-mouthed glass with room-temperature water. Tap water is usually fine—houseplant roots don't like water that's too cold or too hot. A clear vessel lets you monitor the water level and watch for algae, and a narrow opening helps hold the cutting in place. (If you notice brown leaf tips over time, try filtered or distilled water.)
-
Position the cutting so the node is fully submerged but the leaves stay above the waterline. Submerged leaves rot and spoil the water, so strip off any lower leaves that would sit below the surface. Keep a few leaves up top for photosynthesis.
-
Keep the cutting from slipping down. A narrow opening often does the job on its own, but you can also lay a clothespin or bobby pin across the mouth of the glass to hold the stem in position.
-
Set it in warm, bright, indirect light. Avoid direct sun, which can scorch the cutting, and cold drafts, which slow growth. More bright, indirect light generally means faster rooting. In a dark room, a grow light can speed rooting by up to about 50%.
-
(Optional) Dip the cut end in rooting hormone first. This powder or gel can speed root development, but a little goes a long way—too much actually slows rooting. It's helpful but not required.
That's it. Now it's a waiting game—set the glass somewhere you'll see it daily so you remember to check the water.
Keeping the Water Fresh (The Habit That Speeds Rooting)
Once your cutting is in its jar, the single most important thing you can do is change the water regularly. Swap it out every 3 to 7 days. This isn't just about keeping things tidy—it's about oxygen.
Here's the part most beginners miss: roots need dissolved oxygen (the tiny amount of air naturally present in water) to form. Fresh water carries that oxygen. As water sits still, the oxygen gets used up, and stagnant water starts to grow algae and bacteria and can rot your cutting. In other words, stale water actively starves the roots you're trying to grow.
The nonobvious tip: changing the water more often can dramatically speed up rooting. In one hobbyist experiment, a cutting whose water was refreshed daily started rooting in about four days, while cuttings changed weekly (or never) did nothing. So if you want faster roots, change the water as often as you reasonably can—even daily is fine.
A few quick habits to make it easy:
- Rinse the vessel each time you refill so algae and film don't build up on the glass.
- Use room-temperature water. Roots dislike water that's too cold or too hot, so let cold tap water sit a moment before pouring.
- Watch the water clarity. Cloudy or smelly water is your cue to change it early.
Build this into your routine and rooting takes care of itself.
How Long Until Roots Appear?
Most beginners expect to see roots overnight—so let's set the record straight. You'll usually spot the first tiny white roots in 7 to 14 days, and a full, healthy root system in about 4 weeks. From cutting to ready-to-pot, 3 to 6 weeks total is completely normal, so don't panic if week one looks like nothing is happening.
Real examples back this up: one pothos cutting showed roots in 11 days and reached 3 inches by week four, while others take 10 to 12 days for first roots and up to a month before potting.
Why the range is so wide: rooting speed depends on temperature, humidity, light, and the time of year—not just luck.
- Warmth and humidity help. Cuttings root fastest in a warm, humid spot with bright, indirect light.
- Season matters most. Spring and summer (the plant's growing season) give the highest success rate. Cuttings taken in fall or winter root slowly, or sometimes not at all.
Bottom line: give your cutting at least three to four weeks before you decide it isn't working. Patience is the main ingredient here.
Moving Your Cutting to Soil
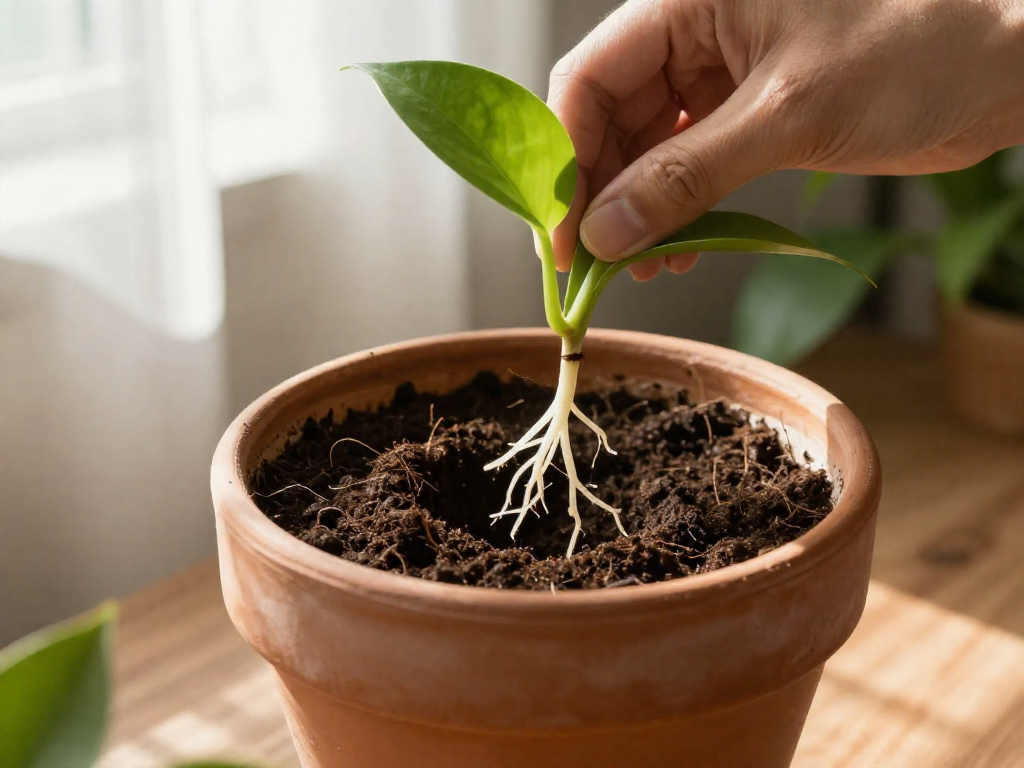
Once your cutting's roots reach roughly 2 inches long, it's ready to move into soil. This is the step where beginners often wait too long—and that hurts survival.
Here's why timing matters: water roots are more fragile than soil roots, and the longer a cutting grows in water, the harder the switch becomes. Pot up sooner rather than later, while the roots are still short and adaptable.
Don't worry that you're forcing a "water plant" into dirt. Water roots and soil roots aren't different types of roots—they're the same roots simply adapting to their surroundings. Move the cutting early enough, and it adjusts to soil with little fuss.
How to make the switch:
- Choose a small pot with drainage holes and fill it with well-draining potting soil (a mix that lets excess water flow through instead of staying soggy).
- Nestle the roots in and gently firm the soil around the stem.
- Keep the soil consistently moist—not soggy—for the first couple of weeks to ease the transition. This helps the roots stay comfortable as they adapt from water to soil.
After those first weeks, you can settle into your plant's normal watering routine.
Other Vines You Can Propagate the Same Way
Good news: the exact steps you just learned for pothos work for a whole family of popular houseplants. That's because pothos belongs to a group called aroids (a plant family known for tropical trailing and climbing vines), and aroids root especially well in water.
Try the same water method with these common aroids:
- Monstera (including the Swiss cheese plant and mini Monstera)
- Philodendron (heartleaf and other trailing types)
- Epipremnum (the botanical name for pothos itself)
- Scindapsus (often sold as satin pothos)
It also works well for Syngonium (arrowhead plant), Hoya (wax plant), Ficus, and Cane Begonias.
The rule never changes: submerge a node (the small bump on the stem where roots and leaves form) and keep all leaves above the water line. For beginners, this node-in-water method is the simplest, highest-success way to make more plants.
Troubleshooting Common Problems
Most water propagation failures come down to one thing: rot. Here's how to spot each problem and fix it fast.
Mushy or black stem. This is bacterial rot—the top failure mode—usually caused by stagnant water or a leaf sitting below the water line. Snip off the rotted section with clean scissors (cut back to firm, healthy tissue), wash the vessel thoroughly, and refill with fresh water. Going forward, change the water every 5–7 days and keep all leaves above the water line.
Cloudy or smelly water. Your water is going stale, which invites bacteria. The fix is simple: change it more often—every 3–4 days if you can.
No roots after a few weeks. Check three things: that you cut just below a node (the small bump where a leaf meets the stem, where roots form), that the cutting gets bright, indirect light, and that it's spring or summer. Cuttings taken in fall or winter root slowly or not at all.
Brown leaf tips. Your tap water may be high in chlorine or minerals. Try switching to filtered or distilled water at room temperature.
Sources
- How to Propagate Pothos in Water - Soltech — soltech.com
- Easy Steps to Propagate Pothos in Water — spider-farmer.com
- How To Propagate A Pothos — younghouselove.com
- Julie Khuu | Interior Design • Feng Shui on Instagram: How to propagate pothos: Part 1 — instagram.com
- This Is How Often You Should Change Propagation Water - Planet Houseplant — planethouseplant.com
- House Plant Lovers Addicts | Took cuttings from my pothos to propagate in water — facebook.com
- How to propagate indoor plants in water step-by-step water propagation – lovethatleaf — lovethatleaf.co.nz
- Propagating Houseplants — extension.psu.edu
- Watering Indoor Plants, A Complete Guide | Joy Us Garden — joyusgarden.com
FAQ
Can you propagate pothos in water without a node?
No. You need a node—the small brown bump where a leaf meets the stem—because that's where roots form. Nodes contain undifferentiated cells that turn into roots once they sense moisture, so cut about 1/4 inch below a node. A leaf alone, with no node attached, will sit in water indefinitely without ever growing roots.
How often should I change propagation water?
Change it every 3 to 7 days. Fresh water carries the oxygen roots need, while stagnant water goes stale and grows algae and bacteria that cause rot. Changing it more often can even speed things up: in one grower's test, a cutting with daily water changes rooted in about four days while cuttings left longer did nothing. When in doubt, refresh with room-temperature water more frequently rather than less.
How long does it take for pothos to root in water?
Expect small white roots in about 1 to 2 weeks, with a healthy root system in roughly 3 to 4 weeks. Timing varies with your conditions—warmth, bright indirect light, and higher humidity speed things up, while cool or dark spots slow them down. Once roots reach about 2 inches, move the cutting to soil; potting up sooner is easier than later, since water roots grow fragile the longer they stay submerged.
Do I need rooting hormone to propagate in water?
No—it's optional. Pothos and most trailing vines root readily in plain water without it. Dipping the cut end in rooting hormone can speed new root development, but you only need a tiny amount; too much actually slows rooting. For beginners, a clean cut below a node, bright indirect light, and fresh water are far more important than any hormone.
Can I leave my pothos cutting in water forever?
You can keep it in water long term, but it's not ideal for a full-sized plant. Water roots and soil roots aren't different types—they're the same roots adapting to their surroundings—and roots grown in water are more fragile. The longer a cutting stays in water, the harder the eventual switch to soil becomes. For the healthiest plant, pot it up once roots reach about 2 inches. If you prefer to keep it as a water display, change the water regularly to keep oxygen up and prevent rot.
What's the best time of year to propagate pothos?
Spring and summer, during the plant's active growing season, give you the best success. Cuttings taken then root faster and more reliably. Fall and winter propagation still works but often takes longer, and some cuttings may not root at all. To improve your odds any time of year, start with a healthy parent plant and keep the cutting warm in bright, indirect light.
Is tap water okay for propagating cuttings?
Yes, room-temperature tap water is generally fine and even helpful, since fresh tap water carries dissolved oxygen that supports root formation. Roots dislike water that's too cold or too hot, so let it come to room temperature first. If your tap water is heavily chlorinated or high in minerals—sometimes shown by brown tips on new growth—you can switch to distilled or filtered water instead.
See also
- Best low-light houseplants for apartments
- How to water indoor plants: a complete beginner's guide
- Understanding bright indirect light in a small apartment
- Choosing the right potting soil for houseplants
- Pothos care guide for beginners
Related articles
A Beginner's Glossary of Houseplant Terms
Confused by plant jargon? This plain-language glossary defines the houseplant terms beginners hit most—nodes, variegation, perlite, root-bound and more.
Jul 14, 2026 · 6 min read
How to Clean Dusty Houseplant Leaves (and Why It Matters)
Dusty leaves block light and slow plant growth. Learn the simple, safe way to clean houseplant leaves by type—plus what to avoid, like leaf shine sprays.
Jul 14, 2026 · 6 min read
Winter Houseplant Care: Watering and Light When Days Get Short
Learn how to care for houseplants in winter: cut back watering, boost light and humidity, and pause feeding so your plants survive short, dark days.
Jul 14, 2026 · 11 min read